Setting Climbs
How Crux Differs from Other Apps
Most climbing apps use a single static photo of a wall or gym where you select holds to create climbs.
Crux is more flexible—you can take or upload a new photo for each climb. This means:
- If the holds change or you want to set on a new section of the wall, just take a fresh photo.
- There’s no extra charge or limit on the number of photos you can upload.
To save time, you can also re-use previously uploaded photos. More on that below!
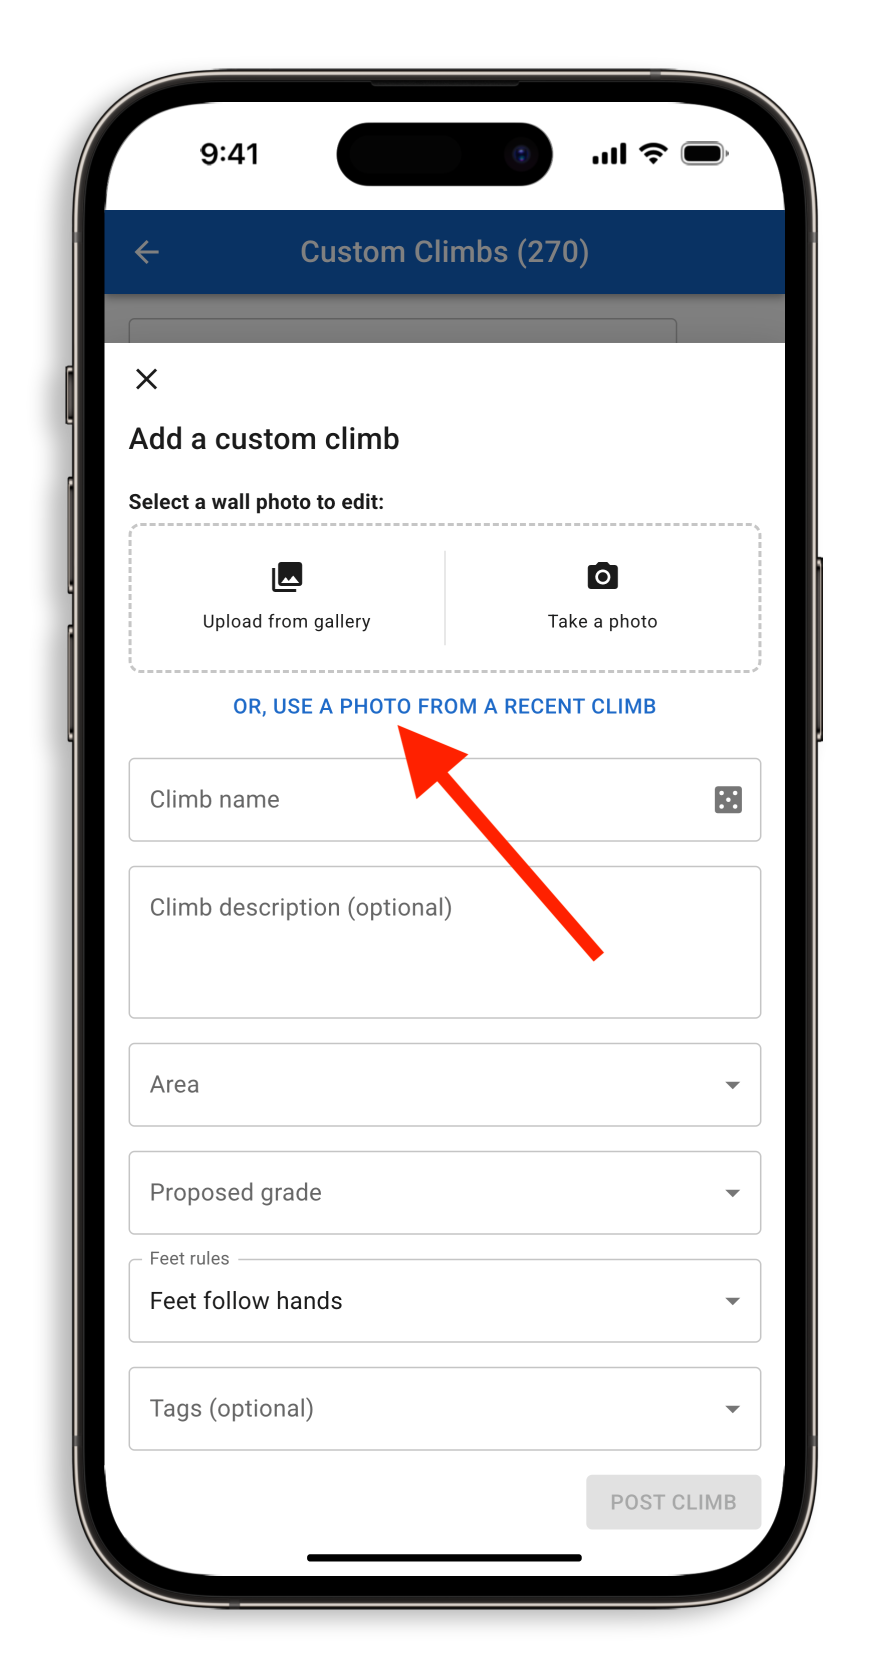
How to Set a Climb
- Open the Climbs directory – Tap "Climbs" on the main gym page.
- Tap "Add climb" – This opens the new climb setup.
- Choose a photo – Take a new photo, upload an image, or select a previously used one.
- Edit the image – Select holds, crop, draw, and add circuit markers. Tap the checkmark when done.
- Enter climb details – Add a name, grade, and any relevant details.
- Tap "Post climb" – Your climb is now live for others to try. Nice work!
The next sections break down these features in more detail.
Re-Using Photos
Crux automatically saves your uploaded photos to the gym’s photo library. This makes it easy to reuse recent images instead of taking new ones each time.
Selecting a Recently Used Photo
- On the image selection screen, tap "Or, use a photo from a recent climb."
- Select a photo from the recent library to open it in the image editor.
Pinning Frequently Used Photos
If you regularly use the same images (e.g., a photo of a spray wall), you can pin them to the top of the list:
- Tap the three dots in the top-right of the photo.
- Select "Pin photo" to keep it at the top of your library.
Editing Your Image
Scanning for Holds
- Tap the wand icon in the top-right corner of the image editor.
- Crux will scan the image for holds (takes ~5 seconds).
- When scanning is complete, an animation will show detected holds. Tap to select them!
Hold positions are saved for each photo, so you won’t need to rescan if you reuse the image later.
If holds aren’t detected correctly, make sure the image is well-lit, clear, and taken at a straight angle.
Creating Circuits
- Select holds for your climb.
- Tap the circuit icon.
- Tap the holds in the order you’d like them numbered.
Drawing on the Image
Use the pencil icon to mark beta, cross out off-limits holds, or indicate start positions.
Cropping the Image
Tap the crop tool, adjust the crop box, and confirm with the checkmark button.
Adjusting Image Style
Crux lets you adjust visual settings (line thickness, image darkness, etc.):
- Tap the settings cog in the image editor.
- Adjust settings to customize the look of your climb.
- Gym admins can set default styles for all future climbs by tapping "Set gym defaults."
Proposed Grade
When you post a climb, you can:
- Set a proposed grade
- Leave it ungraded and let climbers vote
The grade will automatically adjust as more climbers vote.
Gym admins can disable grade voting in settings. If disabled, setter-proposed grades are final.
Feet Rules
Feet rules define which holds can be used as footholds:
- Feet Follow Hands – Any marked hold can be used for feet.
- Feet Follow Hands, Open Kicker – Same as above, plus all holds on the kickboard are allowed.
- Only Marked Feet – Only green-marked holds can be used for feet.
- Campus (No Feet) – No footholds allowed.
- Any Feet – Any hold on the wall can be used for feet.
Tags
Tags make climbs easier to find! For example, if a climb is slopey, tag it as "Slopey" so others can filter for similar climbs.